|
||
|
You are here : |
|
|
|
|
||
|
You are here : |
|
|
|
Quality Check
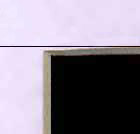
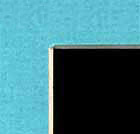
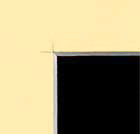
Many people have no idea how to tell a well framed picture from a poorly framed picture—aside from the obvious: color selections and the condition of your artwork. So here's how to become an expert. Matting Corners A well cut mat will have a very clean cut opening where the bevel meets in the corner exactly, not short (resulting in a fuzzy appearance) or too long, known as an "overcut." Also the opening should not flare out or in near the corner, known as a "hook." Correct Matboard The mat should be cut out of the board you specified and not substituted without your knowledge. There are two things to know however. One, the glazing will alter the appearance of the board—glass will tint the board green a small amount, acrylic merely makes the board look ever so slightly darker. Two, there can be small variations in the color of the board due to the manufacturer, but significant differences are quite rare. Clean Bevels The bevel of the mat should be free of specks. Sometimes the boards are manufactured with bits of hard material in the core that are exposed on the bevel when the board is cut. These should be removed if they are very small or the mat simply should be recut. Frames Corners The most problematic part of a frame is the corners. These should meet flush without gaps, the top surface of the moulding should be level across the corner from one side of the frame to the adjacent side. For wood frames, small (not obvious) amounts of correctly matched putty are usually used to make sure there are no gaps in the corner. Finish Also the sides of the frames should match in color and shape. A certain amount of color variation is expected with natural wood stained finishes where the grain is showing, depending from which part of the tree a particular "stick" of frame moulding was created. This doesn't mean the frame should have knots or an inconsistent finish. The frame also should not have any blemishes. Securing The best quality wood frames should have no holes from nails visible from the sides of the frame (except on tall thin frames where they are actually required). We use an underpinner which drives V-shaped metal wedges into the back of the frame to compliment glue in holding the frame together. Some shops use plastic wedges to hold routed corners, but its hard to achieve a properly aligned corner with this process, in our opinion. Glazing Perfectly Clear The glass (or acrylic) should be free of ALL scratches and blemishes, including small bubbles in the materials. Looking close you should find none. This is not always easy, but it makes a difference. We called up to complain one time to a glass distributor about a particular manufacturer's glass products having defects, and they said we were the only one to complain. The customer service representative said, "I know where I'm bringing my framing!" Styrene should not be used in framing, it yellows and shows hairline fractures as it ages. This plastic product is sometimes seen in premade frames and in discount frame shops. Spacers One Piece Spacers The plastic spacers to separate the artwork from the glass, if used, should be a single piece under the lip of the frame. Some shops cut corners and splice short pieces together so they have less waste, but this results in unsightly miters that you can see when viewing at the proper angle. (However, the strips are universally manufactured in only five foot lengths—this has to do with UPS regulations . . . don't ask—so if your order is over 60" long, splicing is necessary.) Assembly/Fitting Flaw Free The glazing should be free of all streaks, there should be no specks or hairs trapped under the glazing. The matting should be free of smudges. Sealed We seal our metal frames with a durable cloth tape, something pioneered in our shop over 20 years ago. Almost no frameshops do this and if someone else is doing it, they more than likely learned it from us. Wood frames should be paper or tape sealed on the back. (In the United States, paper is the norm, in Europe tape is common.) The wire on the back should be wrapped tightly and neatly and there should be equal amounts of wrapped wire at each end. No Gaps Depending on how you specified the artwork be held in place it may be perfectly flat or it may have a certain wave to it. (See Picture Framing FAQs.) There should not be gaps under the mat around the artwork, it should be snug (unless the artwork itself is very wavy). The backing board has to be put in the correct way to assure this. The Things You Can't See Unfortunately, once the order is complete, there are things you can't see—until later—that also determine how well your job was done. Securing Artwork Valuable pictures secured by hinging should be only hinged at the top, not secured with tape all around, as this causes buckling. Also proper materials should be used for hinging. Masking tape is the evil-of-evils for hingings, as rubber cement is the evil-of-evils for mounting. If a shop vacuum-mounted your valuable artwork without your knowledge in order to "please you" by making it flat, you'll probably see some yellowing in few years down the road, not to mention a lesser appraised value to the mounting. Backing/Substrate The backing board should be a single piece, not spliced, except when absolutely required. (We've especially seen this when redoing some shops' somewhat oversized orders, where they "cut corners.") Cardboard and wood products such as masonite should not be used in your order anywhere since these are highly acidic and even with "barriers" can still affect the artwork. Okay, so there you go. A crash course in what to look for in your framing orders. If you want to see poorly executed framing, shop around (or even scrutinize most museums' matting) then come to us for the good stuff. |
Examples of Bad Corners
|
|
![]()
Sign up for our Email Newsletter! • Friend us on Facebook!
Lenz Arts • 142 River Street, Santa Cruz, CA 95060 • (831) 423-1935
Site By Echo Alley | ©1999-2025 Lenz Arts, Inc. All Rights Reserved, Privacy Statement, Contact Us